


Overview
This is a project aimed at building custom per-model hardware accelerators for machine learning systems to reduce overall time and power cost in inference and training.
We will be using FPGA’s to build these accelerators. We will likely end up using multiple in a distributed fashion for more complex models.
This is based on a concept I’ve had since 2016, but I’ve never had the time to actually implement it. I’m going to be using this blog series as a means to document my progress and hopefully get some feedback from the community.
The in-progress git repo is found here
Overall Project Goals
I’m defining some high level objectives to guide us to the end result. These are:
- Create a high level library in python for building ML models that codegen to HDL for synthesis on an FPGA or ASIC.
- Have it work for both inference and training
- Make it easy to update model or code on the hardware for non hardware engineers
- Abstract away the need to think about ditributing the model across multiple FPGA’s
- Make it useful and robust enough to handle complex architectures for:
- NLP
- Computer Vision
- Audio
Ideas for the approach
This isn’t an exhaustive list, but in terms of hardware accelerators for ML, there are a few options:
- MATLAB HDL Coder
- Intel OpenVino
- Xilinx Vitis
- python based HDL One of: PyHDL, PyRTL, MyHDL
I was tempted to use the Matlab HDL Coder, I have experience with their ML toolbox, simulink and other MATLAB products. However, it’s not open source and it’s not python based. I want to be able to leverage the existing ML ecosystem in python and not pay a licensing fee to do it.
For this first approach I settled on PyRTL. It’s open source so we don’t have to worry about licenses and payment to just develop a side projects with it. It’s a python based HDL that allows for code generation to Verilog or VHDL. Being a pure python library it’s easy to install and use. It also has a nice API for matrices and matmul operations already build into it.
Plus, there’s the huge advantage of the existing ML ecosystem in python, which we can leverage to build our library faster.
My Approach
I’ll focus on inference first, and then move on to training. I’m going to build a subset of ops and layers that I think will be useful for a simple model, and then move on to more complex ones. I’ll also be using the iris dataset in this blog for testing.
I want to focus on taking the Naive approach first whenever possible and only worry about optimization once I have a working system that requires further consideration.
I’m borrowing inspiration from PyTorch and Keras APIs. I am aiming for simplicity where possible, and I want to make it easy for software engineers to use without thinking about the underlying hardware.
I’ll worry about deploying to FPGAs and the distributed communication between them later. We will be simulating results for some time. (I also don’t necessarily have the funds to allocate for an FPGA cluster at the moment).
Our Goals for this Post
We will be focusing on the following two things in this post:
- Creating a Python wrapper class for our HDL tensors
- Data transformation pipelines
- Quantization of data and weights/bias values
Creating a Wrapper Tensor Class
For simplicity of this first blog post we will only consider 2D matrices rather than more general purpose n-dimensional tensors. We will be using the PyRTL Matrix class in the backend to our Tensor wrapper class.
We will eventually extend this to support n-dimensional tensors.
Of note we want to handle quantized tensors, as we will using nint8 values in consideration of the FPGA hardware. Quantization allows us to take a float value and convert it to an integer value reducing the overall bits of storage used for our data and weights. for example going from FP32 to INT8 reduces the number of bits by 4x.
Our 2D-for-now tensor class will look something like this:
    import pyrtl
    from pyrtl.rtllib.matrix import Matrix

    class HDLTensor:
       def __init__(self, *dims, value=None, bits=8, signed=True) -> None:
           if len(dims) > 2:
               raise ValueError("HDLTensor only supports 2D matrices")

           if value is None:
               max_int = 2**bits - 1 if not signed else 2 ** (bits - 1) - 1
               min_int = 0 if not signed else -2 ** (bits-1)
               rand = [[random.randint(min_int, max_int) for _ in range(dims[1])]
                       for _ in range(dims[0])]
               self.value = Matrix(dims[0], dims[1], bits, value=rand)
           elif isinstance(value, pyrtl.Input) or isinstance(value, list):
               self.value = Matrix(dims[0], dims[1], bits, value=value)
           elif isinstance(value, str) and value == 'input':
               self.value = Matrix(
                   dims[0],
                   dims[1],
                   bits,
                   value=pyrtl.Input(
                       dims[0] * dims[1] * bits, 'net_input'
                   )
               )
           else:
               self.value = value

           self.rows = dims[0]
           self.columns = dims[1]
Breaking down the Quantization Options
In general quantizing a float to an int is a lossy operation. We will need to consider the tradeoffs between accuracy and performance. My intention is to pick a quantization scheme that is simple to implement and works well enough for our purposes. We can always improve it later.
The main decisions are whether we do symmetric or asymmetric quantization, and whether we use affine or scale quantization.
There may be other options, but these are the ones I’m considering for now.
Symmetric vs Asymmetric Quantization
In symmetric quantization we use the same number of bits for the positive and negative ranges of the integer. For example, in INT8 we use 4 bits for the positive range and 4 bits for the negative range. This means we map our floats to the range [-127 to 127] in 8 bits rather than the full [-128, 127].
In symmetric quantization the scale factor is the maximum absolute value of the floating point range as thre divisor to the maximum value of the integer range.
We will use symmetric quantization for now as it seems simpler, and my hypothesis is it will result in simpler logic on the FPGA. We can always switch to asymmetric later.
Now to go over Affine and Scale quantization.
Affine Quantization
Remember our integers will be in the range [-(2^B) to (2^B-1)] for signed integers and [0 to (2^B-1)] for unsigned integers. Where B is the number of bits allocated for the integer. So in the case of INT8, using 8 bits for a signed integer range, we get: [-128 to 127].
In affine quantization we shift the range by an amount b and use a scale factor m and get the formula:
F(x) = m * x + b
Scale Quanization
Scale quantization is very similar to Affine quantization, but we don’t shift the range by b and only use the scale factor m:
F(x) = m * x
This lets us set the zero-point at zero.
Again, for simplicity we will go with Scale quantization for now, and we can always switch to Affine later.
Quantization of input data
We will be using 8 bit scale quantization for our input data. We will be using per-feature min-max quantization. This means we will be using a different scale factor for each feature in our input data.
We will be using signed ints to start, but testing unsigned ints later as we progress through this process.
The reason for using quantization is to reduce the number of bits we need to use for our hardware, saving much space over the traditional 32 or 64 bit floats.
We could implement floating point arithmetic on the FPGA, but it’s much more expensive in terms of space and power so we will save that for later, only if we need it.
Some neural network ops will have to be modified to handle the quantization, but again, we will deal with that as we go.
Creating data transformation pipeline
Though we will be doing inference initially, I want to discuss the data transformation pipeline now. I want to be able to use the same pipeline for both inference and training.
I’ve opted to borrow from PyTorch in terms of API, and have implemented a simple pipeline that can be used to transform data. It’s a class that takes a list of transforms and applies them in order to the data.
It’s a simple class that looks like this:
    class TransformsPipeline:
        def __init__(self, transforms: List[NeuralTransform]) -> None:
            self.transforms = transforms

        def __call__(self, data):
            for transform in self.transforms:
                data = transform(data)
            return data
Note we override the __call__ operator for convenience of use. We can then use it like so:
    dataset = CSVLoader("data.csv", has_header=True)

    transforms = TransformsPipeline([
        NormalizeZScoreTransform(
            [0.5, 0.5, 0.5, 0.5], [0.5, 0.5, 0.5, 0.5]
        ),
        QuantizeTransform(bits=8),
        DataSplitterTransform(['train', 'test'], [0.8, 0.2])
    ])

    transform(dataset)
I won’t go into the details of all the transforms here (you can look at the git repo for that), but this is what the QuantizationTransform class looks like for an example:
    class QuantizeTransform(NeuralTransform):
        def __init__(self, bits: int, signed: bool = True, symmetric=True, zero_point=0):
            if not isinstance(bits, int):
                raise ValueError("Bits must be an integer")
            self.bits = bits
            self.symmetric = symmetric
            if signed:
                self.max_int = 2 ** (bits - 1) - 1
                self.min_int = -2 ** bits if not symmetric else - \
                    (2 ** (bits - 1) - 1)
            else:
                self.max_int = 2 ** bits - 1
                self.min_int = 0

        def clip(self, x, u, l):
            if x > u:
                return u
            elif x < l:
                return l
            else:
                return x

        def symmetric_quant(self, x, max_val):
            s = self.max_int / max_val
            return self.clip(round(s * x - self.zero_point),
                             self.max_int,
                             self.min_int)

        def asymmetric_quant(self, x, max_val, min_val):
            s = (self.max_int - self.min_int) / (max_val - min_val)
            return self.clip(
                round(s * x - self.zero_point),
                self.max_int,
                self.min_int
            )

        def normalize(self, max_vals: List[float], min_vals: List[float], data: List[List[float]]):
            for row in data:
                for i in range(len(row[0])):
                    if self.symmetric:
                        row[0][i] = self.symmetric_quant(
                            row[0][i], max(math.abs(max_vals[i], min_vals[i]))
                        )
                    else:
                        row[0][i] = self.asymmetric_quant(
                            row[0][i], min_vals[i], max_vals[i]
                        )
            return data

        def __call__(self, data: Dataset) -> Dataset:
            max_vals = []
            min_vals = []
            for key in list(data.get_names()):
                for row in data[key]:
                    for i in range(len(row[0])):
                        if len(min_vals) <= i:
                            min_vals.append(row[0][i])
                        if len(max_vals) <= i:
                            max_vals.append(row[0][i])

                        if row[0][i] > max_vals[i]:
                            max_vals[i] = row[0][i]
                        if row[0][i] < min_vals[i]:
                            min_vals[i] = row[0][i]

            for key in list(data.get_names()):
                data[key] = self.normalize(max_vals, min_vals, data[key])

            return data
Above we specify the precision in bits and whether it’s signed or not. We calculate the max and min values for each column in the data, then map the values to the range of the quantization (symmetric or asymmetric) and return the data.
How do we check our quantization efforts?
To qualitatively check I took one of the features (sepal length) and quantized it. I then plotted the histogram of quantized data against the original data.
This is the result plotted:
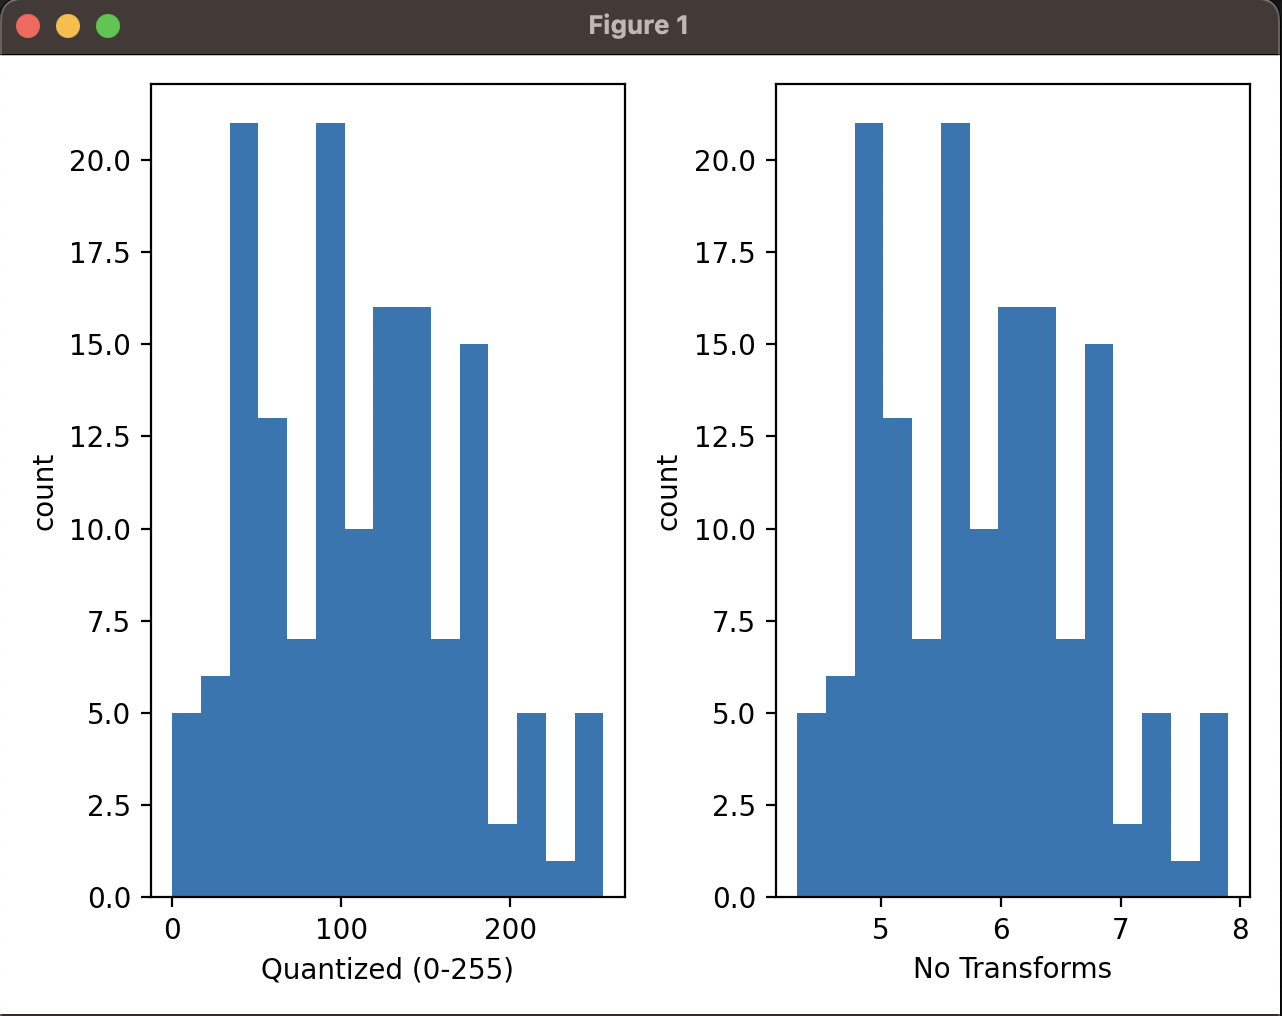
Qualitatively, depsite different ranges the data distribution looks the same and we can see that the quantized data is a good approximation of the original data.
We could also perform a MSE calculation to see how well we did quantizing the data. But I’ll leave that out for now as I feel the qualitative analysis is sufficient.
Next time
Next we will look at how to implement the neural network ops in PyRTL for inference, loading a pre-trained network and using the results from Part 1 to quantize the weights for input to our HDL network.
See the our next post here for details on inference.
Resources
- PyRTL - https://pyrtl.readthedocs.io/en/latest/
- More info on Quantization - https://intellabs.github.io/distiller/algo_quantization.html